


 A few years back I did some work on our scapulars, as I was tired of scapulars breaking, wearing out and having medals fall off, no matter how firmly I sewed them on. I had found some very strong, flat braid to replace the cords, which I sewed on, all the way around the scapulars themselves. I also slit open the backs of the scapulars and placed a blessed miraculous medal and St Benedicts medal inside, sewing the opening firmly together again. This has worked very well with us all, they do not break down and will last a lifetime through. I blogged about this endeavour, here.
I have in recent months been crafting with felt and found it a very easy and beautiful medium to work with. I have crafted religious dolls with felt. Also revamped our yearly Precious Blood craft with felt. I have many other projects in the pipeline, so as to speak, which I look forward to.
One of the projects that has been on my heart since working with felt, is making scapulars from completely from scratch. Making unique creations for each member of the family, for friends and relatives as gifts from the heart. Each scapular's design can be different, chosing religious symbols that are special to the individual person. As long as the scapular is made from 100% brown pure wool felt, there is no set image or design that must be used.
So I bought some 2mm commercially dyed 100% wool felt and cut it up into rectangles, 4.5cm x 5.5 cm (1.5inches x just over 2inches ). I also bought some beautiful hand dyed 100% wool felt to use like a 'blank canvas piece', slightly smaller than the brown wool felt, onto which I could embroider my designs. The colour of this felt could be any colour, my very first creation was being made for my eldest daughter's best friend, so I chose pink. I am presently making one for my mother for her birthday, it is on a neutral 'mushroom' coloured felt. Very light blue would be another popular colour to use. It also allowed me to create a 'pocket' between the two felts, where I could once again, sew in other sacramentals, securely.
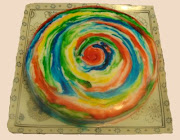
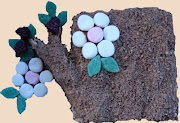
 Here is a photo of a piece of the hand dyed wool felt. It is a 'salmon' colour. Hand dyed felt has irregularities in colour often, which adds to the beauty and versatility of the piece. I wanted to use the commercially dyed brown for the back of the scapular, as I wanted uniformity of colour. For everything else, I was happy for colours with some irregularity. The piece you see above is what I bought to make my Sacred and Immaculate Hearts...when you see the images of the Sacred Heart and Immaculate Heart below I have used for my designs, you will see how the irregular colour suits the hearts perfectly.
I would prefer to use DMC cotton threads (6 stranded) but I cannot afford to buy alot, so I searched on ebay and found another brand of cotton thread that used the same code numbers and colours as DMC. I bought over 400 different colours for $60+ dollars, free shipping. The quality is not quite the same, but it is more than adequate, which is all that matters. I have the freedom now to make very good colour choices and matches in my designs.
I have been doing extensive image searches on the net for many different designs and patterns for my scapulars, I've been saving the images into a folder for future use. The sort of images I have been looking for is: miraculous medals, IHS, crosses, Lamb of God images, Eucharistic images ~ from this I hope to create many templates, so I can offer those I'm making the scapulars for, a choice of designs.
For my first scapular I chose a lovely feminine miraculous medal picture and a matching Sacred and Immaculate Heart that I had drawn many years ago.
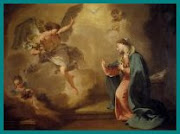
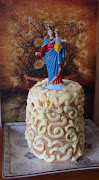
 Here is the holy card image that was the inspiration for the scapular. I shrunk the image down to scapular size, printed it up and traced around the medals to create my felt template, I always make these out of tracing paper. Except for the medals, everything else is embroidery work.

I have also embroidered the mirculous medal images onto the felt medals. For the side of the medal that has the 12 stars around the edge, I embroidered french knots. For the side that has Our Lady's image, I stitched a very simple pattern, considering how small the medals are, see my template below that I used. Where Our Lady's hands would be, I made little French Knots.
 So here is a photo of the felt cut out, the image I shrunk down for tracing the miraculous medals template from and the very beginnings of my embroidery. For some people, the design I have there already is fancy enough and they won't want to go beyond that. The embroidery you can see uses three main stitches ~ buillion stitch (for the roses) I learnt how to do it, the day I embroidered it, it was that simple, I used this online tutorial to guide me. I used a daisy chain stitch for the blue forget-me-nots and green leaves. I used French knots for inside the forget-me-nots. Also a normal straight stitch for a little greenry between the flowers and leaves.
 At this point decided to stitch the pink felt to the brown felt. I matched a cotton to the felt and used a blanket stitch, very fine and firm. I left the top unstitched, so that I could slip in an image of Mother of Good Counsel, on the back of the image I had typed up the St Anthony's Brief, in Latin and in English:
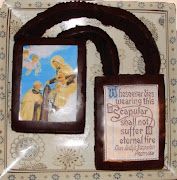
"Ecce Crucem Domini Fugite, partes adversae, Vicit Leo de Tribu Juda Radix David, alleluia. Behold the Cross of the Lord! Flee ye adversaries! The Lion of the Tribe of Juda, The Root of David has conquered, alleluia!"
This prayer is a powerful exorcism sacramental given to us by St Anthony himself, to read the story, click here.
 I printed up a sheet with these images and prayers, cutting them out individually, placing them back-to-back and laminating them. If anyone would like a copy of this document sheet with the images and prayers, please email me. Once I had placed this sacramental into the space between the felts, I then blanket stitched shut the top. It will never come out. To re-enforce this further, I am soon to embroider all around the edges as well.
 Here is a closer image of the scapular, you can click open any of the photos to get a better look.
Here is this side of the scapular now completed. I had 4 different coloured roses, pink, purple, yellow and orange ~ each rose has three shades of the colour. The darker colour in the centre, the next shade, in the middle and the lighter shade on the outside. Roses and forget-me-nots are classic Marian flowers, so very suitable for this miraculous medal design. I think next time I do this miraculous medal design, I will buy some gold thread to outline the miraculous medal and to embroider inside the medals.
Below is the images that inspired the other side of the scapular.

This is an image I drew, using pastels many years back, which was a replica of a very unique image of the Sacred Heart which was owned by my great grandfather. This was going to be my design for the embroidered Sacred Heart, I would also use the ivy pattern around edges as well.
 I designed a matching Immaculate Heart to go with my great grandfather's Sacred Heart. I would embroider this Immaculate Heart and use the forget-me-nots around the edge.
 Once again, I shrunk the images of the hearts down to the size of the scapular in order to trace the designs perfectly, to create a lasting template on tracing paper. Here is the two hearts cut and sewn with a fine blanket stitch.
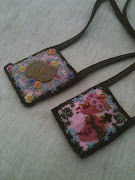
 I sewed the pink felt to the brown felt with a fine blanket stitch, leaving at this stage the top end of the pink felt open, so I could place a miraculous medal and St Benedict medal inside.
 In case the scapular needs to be washed in the future, I've placed the medals inside a very small, plastic click-lock bag. Next time I will place one of the medals on one side of the scapular, and the other with the St Anthony's Brief, rather than having the two medals together. The medals have been blessed, with the St Benedict's medal receiving the special blessing it needs.

Here is a close up photo of the hearts finished. I have used the bullion stitch quite a bit. I've used this stitch for:
 I am very blessed to have a big discount fabric and craft store in my area, here is a photo of one SMALL area of the braid area!!! Here I found the perfect cord for the scapulars, it is flat, thick and strong in chocolate brown.
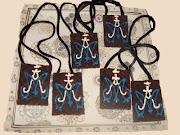
 Here is the braid attached and finished from the front.
 Here it is at the back. When I took this photo I hadn't completed all the sewing of it, I had only sewn around the outside, but not the inside. With this task I bought special quilting thread in dark brown, it is very strong and durable thread that is needed for making this scapular last for a lifetime. I use a very fine, close set blanket stitch and I run the cord all the way around the edge of the scapular.
 This is the first scapular of many to come. I hope to start working on new designs and will share them here as I go along. Below is a photo of the beginnings of my mother's scapular, which is coming along nicely.
If anyone has any questions about this craft, please feel free to email me.


This is an image I drew, using pastels many years back, which was a replica of a very unique image of the Sacred Heart which was owned by my great grandfather. This was going to be my design for the embroidered Sacred Heart, I would also use the ivy pattern around edges as well.
 I designed a matching Immaculate Heart to go with my great grandfather's Sacred Heart. I would embroider this Immaculate Heart and use the forget-me-nots around the edge.
 Once again, I shrunk the images of the hearts down to the size of the scapular in order to trace the designs perfectly, to create a lasting template on tracing paper. Here is the two hearts cut and sewn with a fine blanket stitch.
 I sewed the pink felt to the brown felt with a fine blanket stitch, leaving at this stage the top end of the pink felt open, so I could place a miraculous medal and St Benedict medal inside.
 In case the scapular needs to be washed in the future, I've placed the medals inside a very small, plastic click-lock bag. Next time I will place one of the medals on one side of the scapular, and the other with the St Anthony's Brief, rather than having the two medals together. The medals have been blessed, with the St Benedict's medal receiving the special blessing it needs.
Here is a close up photo of the hearts finished. I have used the bullion stitch quite a bit. I've used this stitch for:
The crown of thorns on the Sacred Heart.
The wreath of roses around the Immaculate Heart.
The lower end of the sword that goes through the Immaculate Heart.
The wounds in the sides of both hearts and the drops of blood.
The flames on both hearts.
The vines.
I've used felt for the hearts, cross and 2 large vine leaves.
I've used 5 different colours in the flames.
Now that the two scapular ends were completed, I needed only to attach the scapular cord.
 I am very blessed to have a big discount fabric and craft store in my area, here is a photo of one SMALL area of the braid area!!! Here I found the perfect cord for the scapulars, it is flat, thick and strong in chocolate brown.
 Here is the braid attached and finished from the front.
 Here it is at the back. When I took this photo I hadn't completed all the sewing of it, I had only sewn around the outside, but not the inside. With this task I bought special quilting thread in dark brown, it is very strong and durable thread that is needed for making this scapular last for a lifetime. I use a very fine, close set blanket stitch and I run the cord all the way around the edge of the scapular.
 This is the first scapular of many to come. I hope to start working on new designs and will share them here as I go along. Below is a photo of the beginnings of my mother's scapular, which is coming along nicely.
If anyone has any questions about this craft, please feel free to email me.


